Fan corrugation crafts. DIY flowers made of corrugated paper: production and examples of work. How to make tulips from corrugated paper
A universal selection of gift ideas for any occasion and occasion. Surprise your friends and loved ones! ;)
Greetings, dear readers and visitors! I have already written several times that I really love decorating gifts in the most unexpected ways. And today I suggest you make paper flowers with your own hands. As many as twenty-odd methods, by the way.
Now, unfortunately, I rarely get around to mass gift wrapping. Moreover, every year there are more and more acquaintances and friends who need to be congratulated along with their relatives. This is very joyful! I love giving presents. But if I choose them very carefully, then lately I pack them in organza bags, since I only decide on detailed packaging for single holidays (like birthdays).
However, my passion for all kinds of packaging beauty is difficult to overcome, so today, together with you, I will practice making beautiful flowers using step-by-step schemes.
DIY paper flowers: simple and clever
There will be a lot of master classes, get ready. Good news for all rose lovers: there will be as many as 4 of them.
Aster
Guys, honestly, I'm not very good at naming colors. So if you see a discrepancy that is obvious to you, write in the comments.
So, first in line is the aster. For it, cut out five circles: two large, two medium and one very small. Fold each circle in half three times, then decorate the edge as in the 4th photo. After unfolding the structure, squeeze each petal to give it volume. Stack all the circles and decorate the middle.
Almost calendula
This flower looks much more like a packaging bow. Prepare a square of paper of the required length for it and cut the edges according to step 2. You will need several such blanks. Place them one on top of the other and squeeze them in the center, tightening them with wire or thread.
Now the most important thing is to straighten the petals so that you get a beautiful resemblance to a flower. Accordingly, the more layers, the more petals and the more magnificent the flower in the end.
Tip: make several of these flowers of different sizes and glue them on the packaging next to each other, then you will get a beautiful bouquet.
Calla
To create calla lilies, you can use either regular double-sided paper or foam rubber (I wrote about what it is in the section about the minion).
For calla lilies, take a stamen (you can crumple it out of paper or make it out of polymer clay) and a petal made in the shape of a heart. Place the stamen in the petal, fold the edges of the petal over the stamen, gluing them together. All that remains is to unscrew the edges to get maximum resemblance to a calla lily.
Such flowers are well suited for decorating postcards, packaging, and as an independent gift in the form of a bouquet.

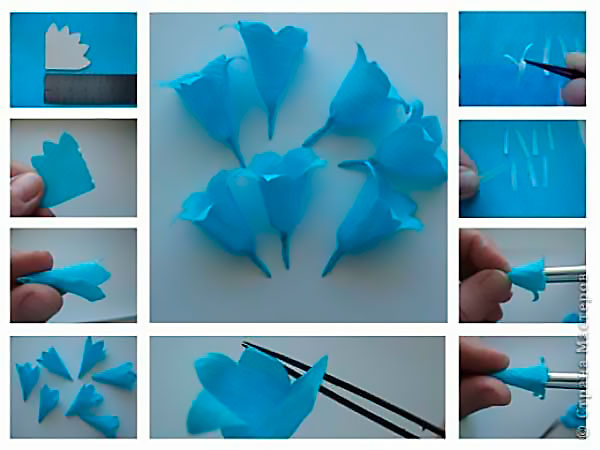
Bell
The master class for the bell is very simple and straightforward. Cut the blank according to the first photo. Glue the edges together and carefully straighten the ends. To make everything look natural, make a center of several elongated stamens, which will need to be glued inside the flower.
By the way, these bells would be great to decorate packaging for March 8th or just a spring birthday.
Lilies of the valley
Well, or something similar. For one flower, take a long rectangle and bend its edge, as in the photo. Cut the wide part so that you get many small strips. Using scissors, twist the strips (to do this, you just need to run the sharp side of the scissors along these strips, lightly pressing the blade against them).
To prevent the flower from falling apart, take a rod and wrap a green stripe around it. Then start carefully twisting the “flower” part, previously coated with glue, on top. Apply the layers tightly so that the greenery does not show through.
But making green leaves is not at all difficult - for them, just fold a rectangle of green paper like an accordion and trim the edges into a triangle. When you unroll, you will get a lot of green leaves ready to be glued to the base.

Poppy
Now we use corrugated paper. Cut out about ten teardrop-shaped petals from it. Stretch the wide part so that the blanks resemble mushrooms.
Take a thin wire and wrap some paper around it - this will be the core. Wind the petals onto this core so that each one slightly overlaps the previous one. When everything is ready, the structure can be pulled together at the bottom so that it does not fall apart.
The master class shows how this flower can be attached to a holiday cap, but believe me, the poppy will look great on a gift box.

Red flower
What is its species? No associations came to mind. But that’s not the point - to create it you will need about ten petals (corrugated paper is used, by the way). Their shape is almost teardrop-shaped. but with a cut end.
Cut out a base circle from thick cardboard. Glue all the petals in layers to this circle, slightly crumpling (doubting? God, how right :_D) the bases, thus forming folds - then the flower will be more voluminous and “fluffy”. Decorate the center with some button or bead.
Such a flower, by the way, will look great made of soft felt - this way it will gain durability. And if you attach the base for the brooch at the back, you get two in one - a decoration for the gift and the gift itself.

Extravaganza of color
There are only two flowers, but the bright combinations create a very unusual effect. Take the crepe paper again, cut out a circle and fold it into a “doll” shape. Cut a “skirt” for it, which you wrap around the doll. Attach the petals on top, gluing them in a circle. Glue two wide leaves at the base.
The second flower is very simple - cut the fringe and twist it into several layers. The flowers are very simple, they can make a very interesting gift arrangement.
Unseen flower
To prepare the base for this flower, I advise you to look here - here the base for the second Christmas tree is created in exactly the same way. But then the differences begin - each of the corners needs to be wrapped using a thick wire or knitting needle so that it turns out to be a spiral.
You can leave this design alone, but I suggest you connect several (say, three) pieces using the existing spirals - the wow effect is guaranteed. Then you can also experiment - connecting elements with spirals into unprecedented designs.
Tip: Are you going to a Japanese-themed party? Then make such a very large flower and take it with you - it will serve as an excellent decoration for a chandelier.

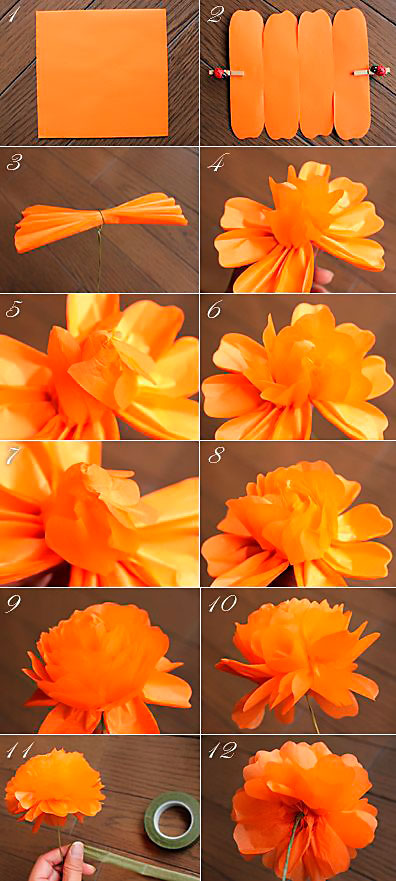
Peony
“Pio-, pio-, peonies are given by a new acquaintance...” - words from the song of the underground group “My Michelle” (I’ve been listening to it often lately, inspired by it). We will make from corrugated paper. You will need five sizes of petals, approximately five copies of each (appearance as in the photo).
Stretch the petals so that you get something like a wave (for both large and small ones). Then form a stamen from the same corrugated paper by folding the paper and further compacting it. You can do this on a wire skewer, or you can do it without it.
Glue the petals onto the finished stamen, each one overlapping the previous one. Do not pull the petal too tightly. In the end, all that remains is to cut the green leaves and stick them around the peony.

4 in 1: dandelion, clove, aster, chamomile
All these wonderful creations of nature are made according to one principle - cutting the edge of a strip from which a flower will be made. The final shape of the flower depends on the cutting shape. Please note that some require a core and others do not.
Please note: despite the very simple design, the flowers turn out very realistic. If you have very little time to make, then this is an ideal option.
Experiment and discover your unprecedented plants - be sure to tell us what happens.

Paper roses
Magic roses are one of my favorite flowers
Rose with twisted edge
The main difficulty here is to carefully twist the edge of the corrugated paper, straightening out the folds. Then make sure that the folds are even. Now twist the strip so that the layers fit tightly together. At the end, secure with thread, trim off the excess.

Simple rose
Need to make a plant in five minutes? Then this rose is definitely for you! Just cut out a circle and draw a spiral in it. Cut out a spiral as in the photo and twist the rose, starting from the longest link of the spiral (the central part will serve as the base).

Big rose
Even gigantic, if you follow these exact dimensions. The heart petals are stretched and placed on top of each other in a circle, secured with glue. Green petals are attached at the end. Of course, the flower doesn’t have to be as big as in the photo – go with your preferences.
Twisted paper rose
Once upon a time I already described this method of creating a rose (here is the second one). The principle is absolutely the same, but the sizes of the triangles resulting from twisting must be the same along the entire length of the ribbon, otherwise the flower will not be very neat.
Once I even made a Rosemary doll, which took part in a city exhibition. Her whole body was covered with roses, made exactly according to this method (the roses were made from ribbons, however).

Clover
I'll just show you how to make the base for the four leaf clover. To do this, take a square of paper and fold it in half lengthwise and in half again. Fold the ends towards the center. Cut out a heart from the resulting design. The result will be exactly what we wanted - a happy flower.

Nameless
No matter how I tried, I couldn’t give a clear name. As a result, the product remained just a beautiful flower, reminiscent of kanzashi motifs (the Japanese art of making jewelry from satin ribbons).
The beginning here is the same as in clover. But after bending the edges, you will need to bend the ends so that the length of the bent part is equal to the length of the visible side in the middle. Then these parts are straightened out and their edges are folded so that the sides are even. They are folded again and glued together to form three stamens. There should be three such petals.
This flower is most suitable for decorating a gift in Japanese style.

And again the aster
This time you need to glue the petals along the edge until you reach the desired volume. Decorate the center as you wish or simply fill it with as many petals as possible.

At this point, I declare the big flower review closed. I hope you have found exactly the option that will help you decorate your gift in the best possible way. See you soon, subscribe and share with your friends!
Sincerely, Anastasia Skoracheva
 Paper flowers can enliven any space and become a wonderful addition to interior and exterior decoration. Paper inflorescences are used to decorate wedding arches, areas for themed photo sessions, and also use corrugated paper compositions for sweet designs. You can create masterpieces from corrugated paper with your own hands.
Floral decoration
 Often there is a need to formally decorate a room to celebrate an event. Joint corporate meetings, family holidays or photo studios require the creation of a special atmosphere. To do this, it is advisable to use compositions that will not wither and fail at the most inopportune moment - paper flowers. They are versatile and unpretentious.
Experienced designers are ready to offer a lot of options where every little thing will fall into place, and the space organization project will simply stun. However, in the modern world, handicrafts have captivated creative people so much that entire communities of craftswomen are happy to share the secrets of creating flowers. Today it will not be difficult to find a master class that will provide diagrams and templates of paper flowers. Creating paper flowers with your own hands that will act as decoration is easy and fun if you follow the instructions.
Corrugated paper
 So, let's look at the options for bouquets that can be created using paper. For souvenir products, craftswomen use regular office paper, creped or corrugated, and special floral products.
Paper meadows are so popular that there is a whole industry of creating special devices to make flowers look like real ones. For example, the color range of corrugated paper is striking in its diversity. Purple shades are so ideal for creating violet inflorescences that it is difficult for the eye to distinguish them from natural ones. Pink and red tones can perfectly recreate any variety of the queen of the garden - the rose.
Beginning craftswomen should pay attention to the thickness of the paper.. There is very thin corrugated paper. It is intended mainly for children's creativity or for beginning craftswomen as educational material. Real masterpieces are made from thick, high-quality, well-tinted paper. It springs beautifully and takes the petal shape specified by the craftswoman.
From office paper
You can also make cute flower decorations from ordinary white sheets. Let's say beautiful callas, chrysanthemums or daisies will look amazing on snow-white, high-quality A4 paper. You just have to show your imagination, how the pieces of cut strips will come to life and become petals.
The advantage of this paper is that it holds its shape well. This means that the inflorescences will look original and solid in the interior. We find another advantage in the ability to create large leaves that do not wrinkle. Colored office paper also comes in different shades. Delicate pink or red bright colors combined with classic snow-white can often be seen recently in the decoration of wedding events.
You can get a lot of ideas by looking at photos of finished holiday designs.. We find such voluminous flowers in the design of arches, chairs, and as additional accessories on the table - they are used to decorate napkin holders, stems of glasses, and nameplates for guests.
Ideas and implementation of a gift made from paper flowers
Today, sweets decorated in floral arrangements have become popular..
In this regard, a whole direction in paper creativity has appeared - sweet design. Each candy can be wrapped in a paper flower. This will be an original sweet bud that will win the heart of any woman. Such gifts are very good to give on March 8, your birthday. The hostess of the house who receives guests will also be delighted by such a surprise.
Idea No. 1
 For example, you can create a bouquet in a basket. A wicker basket with flowers, in which the highlight will be your favorite confectionery, will definitely not leave anyone indifferent.
You can buy a ready-made basket and place roses or peonies in it. You can also weave a basket yourself. There are many master classes on weaving dishes from wicker or from newspaper tubes. If you don’t have time to master many techniques at once, then you should use a ready-made option.
Idea No. 2
 This method is considered the simplest and relatively inexpensive. You can decorate a box of chocolates from the store with flowers that you made yourself. To do this, you just need to buy a few very good sweets and create buds of your favorite flowers with them.. After this, glue the buds onto the box, forming an appropriate composition. You can plant callas or tulips along the edge of the box as a frame. The main composition will look good in the corner, and on the opposite side there will be echoes of the motifs in the form of buds that have not yet opened.
In the same way, you can decorate even an ordinary chocolate bar, and it will turn into a surprise made with soul. And if you add even more charm with the help of beautiful personalized packaging, and choose the chocolate itself from elite varieties, then the product can even serve as a full-fledged gift.
Preparation and creation process
First you need to make sure that you have at hand the necessary materials from which the flower will be created. It is also equally important to prepare the tools with which the parts will be made and the petals will be assembled.
So, let's take a closer look at how to make a paper flower with your own hands.
Materials:
- corrugated paper of the desired color;
- PVA glue;
- tape (can be double-sided);
- glue gun;
- threads;
- toothpicks or wooden skewers;
- favorite candies.
These materials should always be on hand if you are planning to get acquainted with paper flower art. This is an elementary minimum set with which you can make a classic bud. If the goal is to create masterpieces of a more complex level, then you will have to stock up on special tools that are sold in specialized stores for craftswomen.
Progress:
- You need to decide what kind of flower you want to create and consider whether all the tools and materials are available for this. When creating roses, chrysanthemums or daisies, you will use paper of different colors and thicknesses. When thinking about fastenings, you need to understand whether there are enough tools for the job.
- Create a template for cutting flowers out of corrugated paper. Often, experienced craftswomen, achieving realism, can disassemble a live peony or tulip into petals and transfer them to cardboard. This method is very helpful in achieving a high level. This is what you do when working with fabric flowers. It is better to immediately transfer the contours of a delicate natural petal onto thick cardboard, so that later you do not have to spoil fresh flowers, and the pattern will serve for a long time.
- After preparing the layouts, you can start cutting out petals from paper. It is worth paying attention to the location of the paper web. Place the petals strictly along the folds. Only in this way will it be possible to model later, stretching the sheet across, giving it a convexity. If you cut the workpieces and position them incorrectly, you will have to throw them away; you won’t be able to create the necessary parts from them.
- After the preparatory process, we begin assembling the bud.
- The candy is the center of the composition. If you are making a flower on a stem, then use a skewer or toothpick so that you can then put the flower in a vase or basket. If the bud is made only to stick it to the surface, you can also use a thin toothpick or form a bud around the candy, tightening it at the base with thread.
- First, we glue the middle of the small petals, if it is a rose or peony, and then move on to the large ones.
- You can attach the petals using PVA glue or a glue gun. It is convenient to use double-sided tape and attach the petals to it one by one at the base of the bud. The same can be done with thread, tightening the parts. In the process of creativity, you will understand which method is most convenient.
- Use ready-made paper flowers in bouquets, as your imagination dictates.
Corrugated paper flowers with candies must be well assembled so that they do not fall apart before delivery. This gift must be made mobile.
 It is important that the candy is removed from the bud with some effort, but this should be possible. The problem is if it is impossible to remove the candy from the flower without damaging it, since the decorative composition itself will also serve to decorate the interior or table. A craftswoman who has put her work and soul into a product is unlikely to want the life of a carefully created bouquet to last only until the moment of eating sweets from it.
Pay attention to the expiration date of the candies. The flowers themselves do not fade - this is a huge plus, but the confectionery products lose their freshness. Creating a composition can take some time if you are a beginner, and then a certain period passes before the gift is presented. Therefore, take care in advance so that the sweets do not disappear from the beautiful bouquet.
If you have to transport it, avoid fragile structures; it is better to choose a simpler, but practical and transportable option.
Remember that all endeavors require patience. If the first works are not of very high quality, use a trick. Stock up on additional decor. Ribbons, braid, openwork lace, rhinestones, dried flowers - all this can be used in a composition to decorate or hide the first imperfections. In the future, when you gain experience, all the shortcomings will be corrected.
Make your masterpieces with love! This will help convey the energy of warmth, care, and a piece of the soul.
You always want to decorate the most significant day in some special way. Ready-made decorations are quite expensive, and if you decorate a large room with them, it will cost a pretty penny. Today, there are quite a large number of handicraft methods. Flowers can be made using quilling, beading, cold porcelain and even wool felting. But all these options are labor-intensive and require certain technical skills. You can make original flowers from corrugated paper with your own hands in literally 30 minutes. It always looks fresh and creative, plus you can add easy recycling.
Such jewelry has several important advantages that make it a leader:
- minimum amount of money spent on necessary materials;
- flowers can be made so realistic that they are almost impossible to distinguish from real ones;
- the material can be purchased at almost any stationery or craft store;
- extraordinary beauty can be achieved without specialized tools and complex circuits;
- quick disposal is especially important when decorating large halls or rooms;
- will be an excellent gift or decorative element for any celebration;
- This type of decoration can be made even by a child.
Even with all the abundance of DIY methods, flowers made from corrugated paper have been and will be at the peak of popularity. A wonderful way to express yourself and realize your wildest fantasies.

Preparatory work
Before you begin the mystery of flower production, you must first of all equip yourself with all the necessary arsenal in advance. Corrugated paper is best purchased in rolls rather than sheets. The roll contains a large enough footage, which is enough for a whole heap of buds, flowers and petals.
It is recommended to select paper in more natural shades, unless, of course, as planned, the final work should look natural and natural. For buds, leaves and stems, you should take several flowers, in this case, you can play with the shadows. Then the flowers will look more “alive”.

For the stem you need to take a thin pliable wire, a floral sleeve or any other materials.
You will also need thick cardboard for cutting out blanks, glue and sharp scissors. Not necessary, but you can prepare fishing line or strong silk threads and a breadboard knife.
It is best to work in good lighting, this can be either natural light or fluorescent lamps.
Important! If there are small children or animals in the house, it will be safer to work on a high table rather than on the floor.

Flower making process
At the initial stage, many needlewomen are faced with the question: how to make flowers from corrugated paper and where, in fact, you need to start. Of course, each craftswoman has already developed her own technology and some little secrets. However, nothing is impossible for those who want to reach the heights of professionalism.
The most complex technologies always come down to the simplest steps:

The stem, like the flower, should look natural. This can easily be achieved with regular wire and green paper. It is necessary to measure the required piece of wire or floral sleeve and decorate it with prepared corrugated paper, fabric, or even paint it with acrylic paints. Then attach leaves and thorns if the flower implies their presence. The finished flower is “settled” on the stem using glue. Since the wire and the floral sleeve are movable, they can be given absolutely any shape and bend.

How to make realistic peonies.Bystep by step instructions
Peony is a magical flower that is traditionally a symbol of purity and love. A cute bouquet can be an excellent gift for a wedding or birthday of a beloved friend. Peony flowers in nature are quite large in size. For a bouquet of flowers you don’t need to make a large number of heads; 7 pieces will be enough.
If you want to achieve a shade close to the natural color, you can take snow-white or milky paper and give a few strokes of pink, orange or peach acrylic. You can make delicate peony flowers from corrugated paper with your own hands in just 20-30 minutes.
At the first stage, you should carefully cut out rectangles according to the template and slightly round them, thereby giving a natural roundness to the petal.
To make one peony you will need to prepare 10 strips for small petals, 10 strips of wider paper for large petals and several strips of different sizes of green paper for making leaves. To give a realistic shape to the peony, you need to cut the petals slightly oval with a small stem, and the leaves slightly pointed towards the top.
 peonies - process
After all the shapes are cut out, with careful movements the petals need to be slightly stretched in width and height, until the petal is visually closer to the natural one. Next, give the petal a convexity on the outside, thus giving it some volume.
Important! When stretching petals or leaves, you must avoid using nails, otherwise the tenderness and fragility will be spoiled by unwanted lines.
Then the process of “folding” the bud begins. To do this, take several of the smallest petals and wrap one tightly in the other. When wrapping, you must ensure that each subsequent layer overlaps the seam of the previous layer. Thus, gradually, the petals are stacked on top of each other in layers. When the flower has been collected, its base should be secured with thread, fishing line or glue. Since a peony is a carelessly disheveled flower, you can safely tear some of the petals of the finished product slightly and then stretch the edges again.
In total, it will take about 25 petals to make one peony. Sepals are made from green paper. It is necessary to prepare about 10 green leaves, after shaping, wrap them around the finished peony.
To make the flower more voluminous and lush, at the initial stage a round candy or a formed foil ball is placed in the core.
It should be remembered that natural flowers in nature do not have perfectly smooth edges and lines, so the less neatness there is in the bud, the better.

Master classfor making delicate lilies
The royal lily flower is sensuality combined with majesty. Volumetric flowers made of corrugated paper always attract attention. This is not only a good addition to the main gift, but also a great decorative element for any holiday or event.
Using the example below, we will describe step by step how you can make a wonderful lily from ordinary corrugated paper.
To work you will need:
- paper in light lilac, yellow and green shades;
- watercolor, gouache or acrylic paints;
- glue or glue gun;
- wire for the stem, approximately 30 cm;
- brush and sharp scissors.
If the paper is on a roll, then you need to cut a strip 7 centimeters wide from it. From the resulting piece, cut into small rectangular pieces, which should be given a rounded shape to the lily petals. Then, the edges need to be stretched a little with your fingertips, for greater naturalness, and slightly curled with scissors or a regular pencil. Make a depression in the middle of the petal, thus giving it a natural roundness.
When the petals are completely ready, the magical process of transformation begins. To do this, you need to mix brown and dark lilac colors and use the resulting tone to draw natural dots at the base of the petal. For greater naturalness, the dots should be thicker at the base and almost disappear towards the middle.
The stem is made from wire. The required piece of wire is cut and decorated with a thin strip of green corrugated paper. Before wrapping paper around the wire, it is recommended to stretch it properly. This is done to ensure that all unnecessary stripes and folds disappear.

At any edge of the finished stem we make a pistil and form a stigma using hot glue. To be convincing, you should paint this place with green paint.
The stamens are made from yellow paper. A small even square is cut from the roll. We cut strips along its entire length, but leave the base solid. Then you need to twist each strip with twisting movements and treat the tip with a drop of hot glue. After all the work is done, dip the prepared stigmas in semolina, paint with acrylic or gouache in a brown-chocolate shade and let dry.
Lily leaves have a rather elongated shape. You need to cut long rectangular strips of green crepe paper, slightly stretching and folding them. We glue the stamens to the pistil and add three lily petals to the finished structure, placing them slightly above the tips of the anthers.
After this, glue three more petals over the joints of the previous petals and twist the edges of the finished flower again.
The final stage is “installing” the finished lily on the stem, adding petals and securing with drops of glue.

Corrugated flowers with candies
Every needlewoman, having reached a certain level, wants to do something extraordinary and memorable. Not a single holiday or special event is complete without sweets and flowers. Modern craftswomen have decided to combine these two components into one and call this direction suite design.
Flowers made of corrugated paper with candies came into fashion not so long ago, but they have already managed to win over quite a large number of the public with their originality and creativity. Today, through your PC, you can view photos and videos of a huge number of master classes on making an unusual bouquet. A detailed step-by-step description will help you turn all your bold ideas into reality. The main thing is not to be afraid to experiment. Only in this case will you get bouquets that are worthy of decorating not only birthdays, but also weddings.

To make a bouquet you will need chocolates, preferably round and wrapped. This will greatly facilitate the task during the formation of a flower bud. You can take paper of absolutely any color, here you can give free rein to your fantasies. Squares should be cut out of the corrugation, rounded and petals formed by pulling and stretching the finished fabric.
The next step is to cut out squares of baking film. The candy is wrapped around the finished square and a small tail is left at the bottom, which is then wrapped with a beautiful thread or gold-colored ribbon. We gradually “wrap” the finished workpiece, layer by layer, with petals, immediately giving it the shape of a natural flower. You must try to ensure that the first layers completely cover the candy, but the subsequent layers may already be half-open.
A chic bouquet is carefully formed from ready-made flowers. This is done in different ways. You can “plant” each flower separately on a pre-prepared wire; you can use skewers, a foam ball, a plastic bottle or foam. After the bouquet has been completed, it can be decorated with satin ribbons, various laces, beads, stones or rhinestones. Such an original gift will definitely leave behind indelible pleasant memories.
To create a spectacular bouquet, you don’t have to stop at just one type of flower. These can be a wide variety of combinations of daisies, roses, daffodils, poppies, tulips, orchids and so on.

Giant size flowers
You can make large flowers from corrugated paper with your own hands for any occasion. Such decoration will always look festive and unusual. Flowers of a delicate shade can decorate a romantic party or wedding celebration. Huge, but at the same time fragile, as if made of porcelain, can add even more atmosphere to the holiday.
For a children's birthday party, products in bright and flashy colors are suitable. Not only will they become indispensable for decorating the festive photo zone, but also photo sessions. Magnificent life-size flowers made of corrugated paper will be able to “greet” guests at the entrance. With such a huge bouquet, you can properly greet your beloved wife from the maternity hospital or give it to your girlfriend.

Step-by-step process for making a large rose:
- on thick cardboard, draw a petal template in the shape of a heart and a drop;
- cut out 15 large hearts and 5 petals in the form of droplets from paper according to the template;
- each cut petal should be well stretched up and to the sides, giving it a natural and natural shape;
- for droplet-shaped petals, you need to beautifully wrap the edges using a pen or pencil;
- For the heart-shaped petals, we make wavy bends using a pencil only on the sides;
- for the stem you will need a piece of ordinary soft wire, which must be decorated with floral tape or green corrugated paper;
- the formation of a bud should begin with small petals, after gluing them to the stem with a drop of glue;
- after the base is formed, first the droplets and then the hearts are glued to it one by one;
- from a long strip of green paper, a sepal is cut into small cloves;
- The finished sepal is fixed around the base of the bud, secured with green adhesive tape or a drop of glue.
At this stage the rose is completely ready. In order to make leaves, cut out oblong shapes from green corrugated paper. After this, place the edge of the decorated wire in the middle of the finished sheet, after moistening it with glue. Then fold both halves of the sheet so that the wire remains hidden inside the petal, and bend the remaining edges of the paper back.
At the final stage, the leaves are attached to the stem with adhesive tape and decorated with corrugated paper or a few strokes of acrylic paint.

Giant flowers made of corrugated paper can magically turn the most ordinary holiday into an enchanting celebration.
DIY artificial flowers have become increasingly popular lately. Easiest to do corrugated paper flowers, which is very convenient to use. Today in stationery stores you can buy corrugated paper of different colors and make original crafts. Corrugated paper is widely used in suite design, so you can master this type of needlework too.
How to make peonies from corrugated paper
Flowers made from corrugated paper are very similar to real ones, since this paper has a pleasant texture and a variety of colors.
Materials:
- corrugated paper of different colors;
- paper clips;
- scissors;
- wire.
Take a whole sheet of corrugated paper and start folding it like an accordion.

You can choose your own color scheme for the peony and fold each leaf.

After this, lay out all the accordions in a row and cut each one a few centimeters so that it is shorter than the previous one. It is important that the longest leaves are a primary color, such as pink, red or burgundy.

Once you have trimmed each leaf, trim each edge to create a slightly sharp edge.

Then take paper clips and mark the center part on each accordion.

Then lay out the accordions from longest to shortest and start folding like an accordion again, but this time all the sheets at once.

Interesting article: How to make a sweet bouquet with your own hands
Take the wire and tie it in the central part.

All that remains is to gradually fold back the leaves, starting from the smallest ones. Corrugated paper, unlike papyrus paper, stretches well, so you can safely straighten each petal, giving it a certain shape.

You should have a beautiful large crepe paper peony.

These flowers can be used to decorate a room or create a wedding floral arch.

Corrugated paper decorations
Flowers are often used to make hair and clothing decorations. If you need a beautiful accessory for one evening, you can make it from corrugated paper in any color.

First you will need to cut the corrugated paper into strips 3-4 cm wide. Then you will cut it into rectangles to make the petals.

Separately, take yellow or gold paper and cut it into longer strips to make stamens.

Each rectangle needs to be shaped like a petal, and slightly compressed at the bottom. You will need to cut out a circle from cardboard that will act as a base. Glue each petal onto it, starting from the edge and moving towards the central part.

To shape the petals, start stretching them slightly at the edges.
Once you have completely filled the entire circle, you can begin making the stamens. To do this, take a strip 2.5 cm wide and 7.5 cm long. Make cuts on one side and then roll it into a roll and secure it with glue.

Useful article: DIY corrugated paper roses
You can change the shape of the petal by making different cuts. Try making flowers of different shapes and sizes and make beautiful decorations. If you glue a flower to a hairpin using hot glue, you will get an original hairpin.
Volumetric flowers made of corrugated paper
These flowers look beautiful in a vase, so you will need to think about the length of the wire stem in advance and choose the right vase.

Take two pieces of corrugated paper and start folding them in half together 4 times. Once you have a small square, fold it diagonally to form a triangle.

Take this triangle from the corner and cut off its opposite edge from one edge. After you unfold your workpiece, you should end up with 8 round figures with a curly outline.

Also read: DIY crocuses made from sweets and corrugated paper
Each circle will need to be taken by the middle and slightly twisted.

Secure at the bottom with tape. Then gradually glue the parts to the wire, and you should get a three-dimensional spherical figure.

You can come up with new blanks for making different colors from corrugated paper in order to use the products for interior decoration or clothing. You can make simple paper crafts even with children. Spend your leisure time interestingly and then you will be able to develop your creative abilities and take a break from everyday difficulties.
Home decor is a constant and never-ending job. In the process, new techniques and types of work are mastered. In this article we will talk about how to make flowers from corrugated paper. This paper can be found in flower shops. But it is available in a larger assortment in specialized establishments that sell everything for needlework. To work, you will also need wire or thin sticks (bamboo skewers are also suitable), glue and scissors.
General principles and rules
Despite the fact that flowers are made from corrugated paper differently, the principles of operation are the same. Here are some general rules that will help you make paper flowers with your own hands that are very similar to real ones.
That, in fact, are all the rules. And one more thing: the stem is cooked first. It uses wire or sticks of different thicknesses, which are wrapped in a long thin strip of green corrugated paper. The tape can be coated with glue and then screwed onto the base. You can twist it dry and secure the edge with a drop of glue. One more point: if you are going to assemble a composition from flowers, leave the lower 1/3 of the stem without decoration - it will be easier to compose a bouquet.
poppies
Poppies from corrugated paper are very easy to make. It is important to find the right shade of scarlet. You will also need a small piece of black for the core. But, if you don’t have it, you can use any dark one and then paint it black.
We make a poppy from corrugated paper like this:
- Fold a small square from paper napkins of any color. We wrap it in black corrugated paper. If you don’t have black, take any dark one, then we’ll paint it.

- We cut out two or three petals of different sizes from scarlet paper: small, medium and large.
- We collect the petals all together (do not put them in a neat pile) and crush them into a ball.
- We disassemble the ball into petals.

- We take the core and wrap the first small petal around it from left to right.
- The second small petal partially overlaps the first, followed by the middle one, also overlapping it.

- The second middle and two large petals form the second row. They are located so that their central part overlaps the junction of the previous row.

- Having collected everything together, we insert the wire into the base, wrap the base with thread, and glue it. Wrap in green paper.

Poppy is one of the easiest flowers to make yourself from crepe paper. At the same time, he looks very good. You can use them in a campaign with other flowers, or make a bouquet of poppies only.
Even such a simple flower can be made in different ways. First of all, you can change the middle. In the master class described above, the core of the flower is very simple. It can be made more like natural. We use the same technology to make the middle, but from white paper. And from black (can be painted) we cut out a strip about 1 cm wide and 4-5 cm long. On one side we cut it into thin strips (a couple of millimeters wide). We twist the resulting “noodles”, obtaining thin stamens. We wrap the stamens around the core, and then proceed according to the same algorithm.
How to make crocuses from paper and candy
An unusual gift can be made using candy as the center of flowers. It turns out to be an original sweet gift. Such a core can be made in flowers with a large, hollow bud inside - a tulip or crocus, for example. Moreover, making crocuses from corrugated paper is very simple. Everything will take 5-10 minutes. Not more.

A bouquet of corrugated paper with sweets is a nice surprise
- Cut out a square of paper with a side of 15 cm.
- We divide it into three parts, making a cut to a depth of 7.5 cm. We get three petals.

- Each petal, measuring 5 cm from the top, is scrolled around its axis and the upper part is bent down.
- Use your fingers to give them a concave shape.

- We take the formed petals and wrap them around the stem so that each petal takes its place - approximately 1/3 of the total diameter. To do this, the bottom edge will have to be pressed down well.

- We make leaves from green paper. Cut out a rectangle with sides 5*8 cm.
- We divide it into three parts, making cuts to a depth of 8 cm.
- Stepping back 3 cm from the edge, twist the strip of paper around its axis, bend the upper part down, straighten it and give it a rounded shape.

- We wrap the leaves around the bud. They should fall at the junction of the petals.

- We take a narrow strip of green paper, twist it around the wire, and form a stem.
That's all, the crocus made from corrugated paper and sweets is ready. Having made 7-9 pieces of these colors, you can put them in the basket. For more variety, you can make some small flowers.
Chrysanthemum
Using the technology described above, you can make chrysanthemums. The difference is that there will be many petals and they will be narrow. But the principle is the same: twist the upper part of the petal, lower it down. Only in the case of chrysanthemums it is necessary to give the entire petal a curved shape.

These paper chrysanthemums also use candy as the center. These corrugated paper flowers are best made from a material that is not too bright. The tones are more delicate and soft. For foliage, muted greens are also chosen. For greater believability, take paper of two similar shades and make petals in two shades.
So, we make our own chrysanthemum from corrugated paper:

This version of chrysanthemum looks good. But for greater plausibility, you can make petals of different sizes. At least three gradations are needed: small, medium and large. They will differ more in length than in width. Such a flower will look more magnificent and will look richer in a bouquet. Try it.
Asters - simple and original
If you need to make simple but effective flowers from crepe paper, try making asters. They are made from corrugation in bright and pastel shades. They look best in a bouquet, and the colors can be different.

Corrugated paper asters can also be made from petals of different sizes - shorter ones closer to the center of the flower (there should be fewer of them), and longer ones on the periphery (there should be more of them). You can bend them in one direction, or you can bend them in the opposite direction. Whatever you prefer.
Corrugated paper roses: step-by-step manufacturing algorithm (2 methods)
The good thing about corrugated paper flowers is that they can be made in different ways. The material is very plastic, it easily changes shape because there are several ways. Some people want to achieve more “naturalness”, while for others speed is important.
1 way (natural look)
For corrugated paper roses, it is better to choose paper of two or three very close shades. This will make the flower look more natural. For example, for the flower in the photo, white and crepe paper was used. The number of petals of different shades is arbitrary, as is their placement in the bud.

The manufacturing procedure is as follows:

As a result, we get a beautiful rose made of corrugated paper. In this design it looks like a real flower. There is an easier and faster way (pictured below).
Method 2 (simple and fast)
We cut out a strip of paper 7-8 cm wide. You can make it uneven - narrower on one side, wider on the other. We fold it, starting from the narrow edge, like an accordion. The width of the “accordion” is 3.5 -4.5 cm. Cut out petals from the resulting stack at 2/3 of the height.
We wind the petals onto the wire (you don’t have to wrap it with green tape yet) starting from the narrow edge. As we roll, we give them shape with our fingers - stretch them on one side, press them at the stem. Having installed all the petals, we secure them with a thread (simply winding a certain number of turns). We adjust the petals, forming a bud.

From green paper, folded like an accordion, we cut out long and narrow petals. Please note that their ends will need to be twisted, so they should not be so narrow (approximately 1 cm). We wrap the cut out petals at the bottom, under the petals, twist the leaves with our fingers, and then shape the stem.
Corrugated paper peonies (with patterns)
For peonies, you need yellow corrugated paper for the core, green for the foliage, pink, cream, crimson for the flower itself. A wire or thin stick is suitable for the stem. You will also need PVA glue.

A peony made from corrugated paper is a rather difficult flower to make. It has many different petal shapes. You can't do this without a pattern. But there are many varieties of peonies, so there are several patterns. Let's give two options. The first one can be printed, cut out and used as a template - it is given in a full-size image. The second option can be drawn with your own hands according to the cells.
Step-by-step manufacturing process with photos:
- From yellow paper, cut out a strip 4-5 cm wide and 10-12 cm long. Fold it several times, cut into thin “noodles,” leaving about 1 cm of uncut edge.
- Roll the resulting tape into a tight roll, using the entire edge for this. Lubricate it with glue and twist it. The result is a shaggy yellow core around which the petals will be attached. We fix this center on a stick/wire, which will be the stem.

- Cut out petals from paper. The minimum quantity is 20 pieces (all types), but the more, the fluffier the flower will be. On the second pattern the number of petals is indicated on each; on the first one some explanation is needed. There are numbers there too. This is the required number of petals.
- Stretch each petal in the middle without touching the edges, giving them a convex shape. Don't try to make them the same. This is not required. During the process, you can still stretch or tighten it a little.
- We start folding the petals from the smallest ones. We place them around the existing center. We place the first small petals only slightly overlapping their edges. Coat the base with glue.

- Next we take the middle petals. We lay them with a slight overlap of one on top of the other.
- Then we lay the large ones and lastly the very large leaves. We coat each layer with a small amount of glue at the base.
- You will also need leaves. We cut them out of green paper. On one side we compress them, forming a petiole, on the other we straighten them in the middle, giving them a curved shape (similar to a boat).

- We attach the leaves under the bud and bend them down.
- You can also make leaves like a peony, but this will require a thin wire and several cut out shaped leaves. Veins cannot be made on corrugated paper, but they can be marked with paint.

- We glue each leaf to a wire, wrap a thin strip around the petiole, then attach it to the stem.

The assembly process is a creative exercise
- Take a long narrow strip of green corrugated paper (about 1 cm wide, 20-30 cm long - depending on the length of the stem). We wrap the base of the flower, then smoothly move to the stem. Finally, secure the edge of the paper with a drop of glue.
The corrugated paper peony is ready. Usually they are used to make a bouquet. When you make the next ones, don't try to make them exactly the same. All flowers in nature are unique. Yours should be different too.

You can play with the size and number of petals, mixing petals of different shades that are similar in color. You can try using paint to make the petals at the base darker. In general, there are a lot of options.
Corrugated paper flowers: photo ideas, patterns
Using the techniques described above, you can make any flower. The main problem is the shape, number and size of the petals. The most important thing is the form. It is characteristic of each petal. Dimensions are arbitrary. Not only do flowers in nature come in different sizes, but recently it has become fashionable to decorate the interior with giant life-size flowers. The decoration is original, but specific. It is necessary to enlarge the basic patterns many times; it is difficult to work with large scales. It is better to first practice on flowers of normal sizes, and then move on to larger ones.

A little about patterns. You can not only find them. If this happens in the summer, take the desired flower and disassemble it into petals. From the whole bunch, choose the most characteristic ones, attach them to a sheet of paper, and circle them. Then the shape needs to be adjusted, taking into account the fact that these are, after all, paper flowers. The pattern will finally take shape after several trials and errors. We will post several patterns and master classes in photos in this section.
Cornflowers
The simpler the flower, the more ways to make it. Cornflowers can be made from corrugated paper using different techniques. Examples are in the photo.


If you want to make it very similar to the real one (A - pattern for a blossoming flower, B - for a bud)
Iris
Making paper iris requires some imagination. A very unusual flower. The photo shows several techniques that allow you to achieve different effects. Some flowers simply resemble the original, others are very similar to it.


All sorts of different things


Lilies... Beautiful, but several techniques are used


Pansies - pattern for making from corrugated paper


For the “advanced”. It turns out to be a very beautiful flower


Cute daisies - an option for beginners